Saturday’s project was installing OpenStack on a ChromeBox.
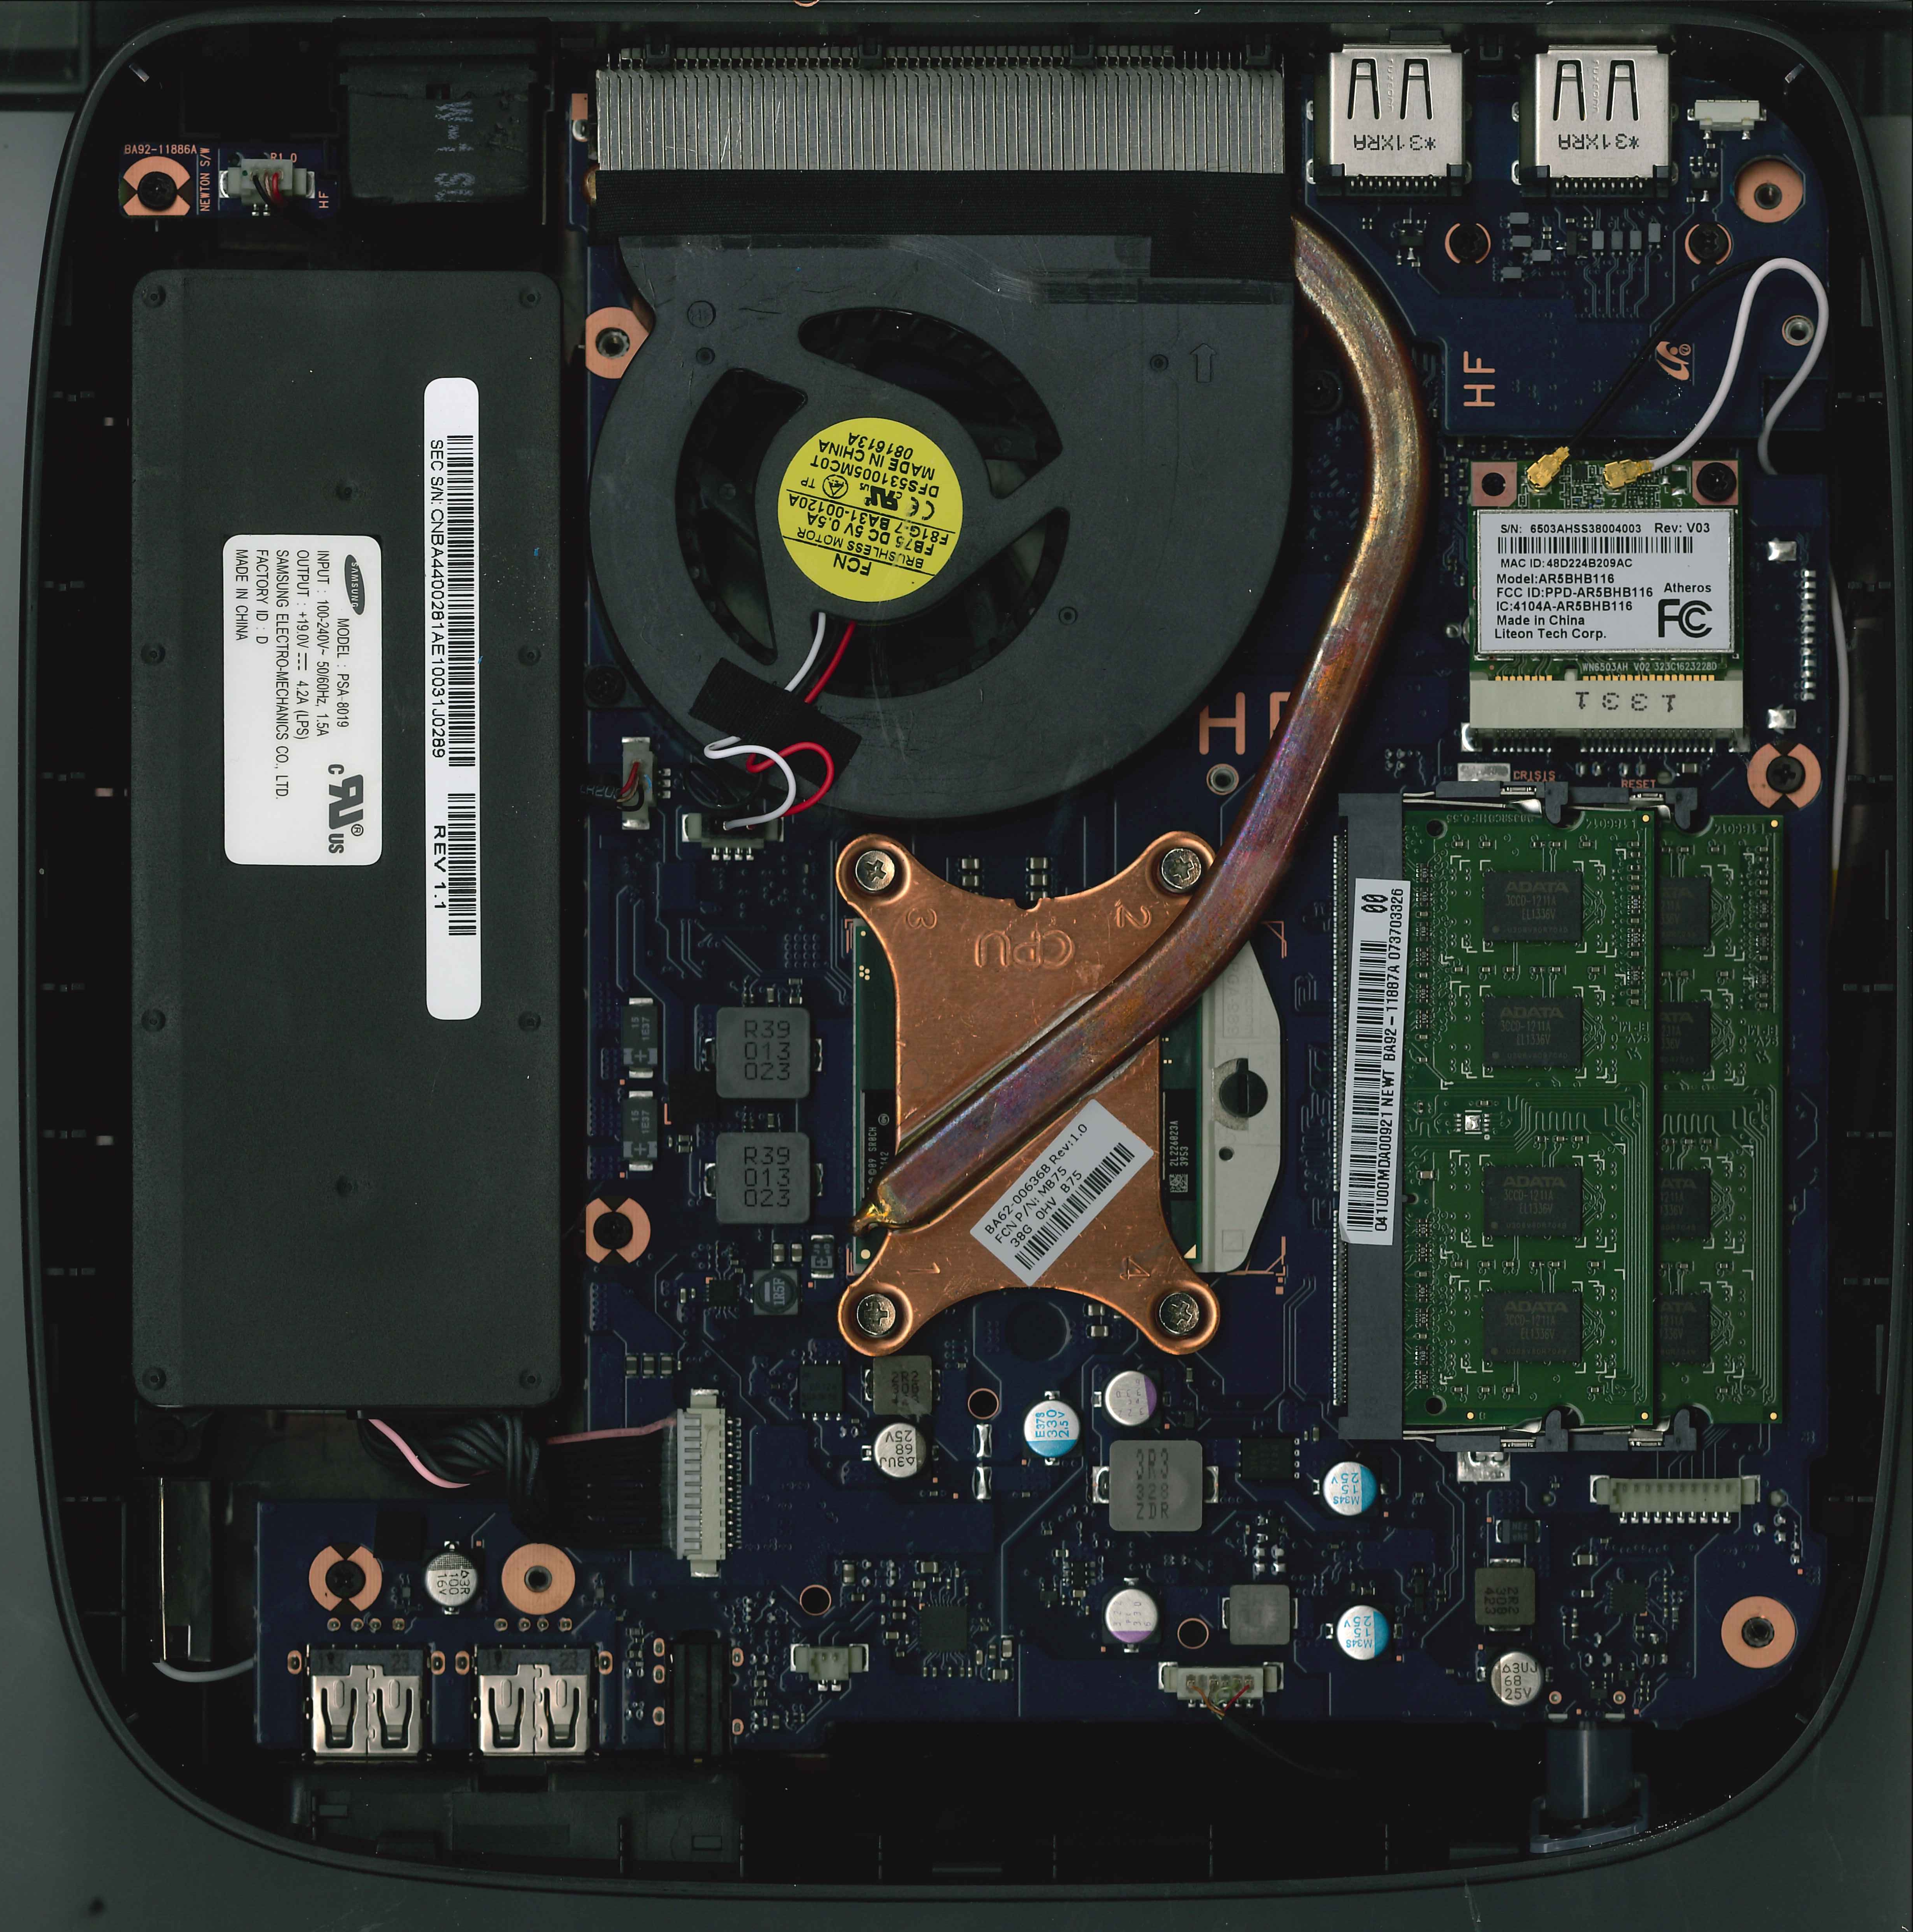
Step 0: Identify your hardware, add RAM
Before you begin, make sure you know which ChromeOS device you have.
In my case, it was a Samsung Series 3 Chromebox.
Thankfully, the memory was very easy to upgrade to 16G, as the bottom snaps right off.
Step 1: Make a ChromeOS recovery USB
Plug in a 4G or larger USB stick, then open this URL on your ChromeOS device:
Follow the instructions.
We shouldn’t need this, but you never know. (And, yes, I did end up needing it during one of my iterations while writing this post).
Step 2: Enable developer mode
The switch in the image is how I put my ChromeBox into development mode.
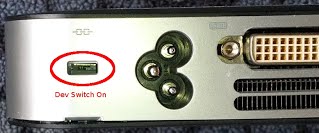
After flipping the switch, reboot.
On this first reboot, the existing on-board storage will be wiped entirely, erasing any account credentials and cached content.
Step 3: Login to the console as “chronos”
Using cntl-alt-F2, enter the username “chronos” at the login: prompt. Hit return at the password: prompt (the default chronos password is an empty string).
Note: You did not actually need to login to google via the UI interface.
Step 4: Enable USB and SeaBIOS booting
Now that you have a shell as chronos, you can enable USB booting.
sudo crossystem dev_boot_usb=1
After enabling and rebooting, you can now boot from USB drives with cntl-u
In order to install Ubuntu (or your distro of choice), we need to legacy boot. This requires a BIOS.
Newer ChromeBox hardware includes SeaBIOS natively.
sudo crossystem dev_boot_legacy=1
After enabling and rebooting, you can now boot to legacy images with cntl-l
If you have an older ChromeBox (like the Samsung Series 3) that doesn’t have a SeaBIOS boot, you will need to flash one.
Flashing a new bootstrap requires a jumper or other physical change to hardware to allow the flashrom tool to write to flash.
NOTE: ASSUME THAT THIS WILL LIKELY BRICK YOUR CHROMEBOX. YOU HAVE BEEN WARNED
On the Samsung Series 3 ChromeBox, the jumper looks like this:
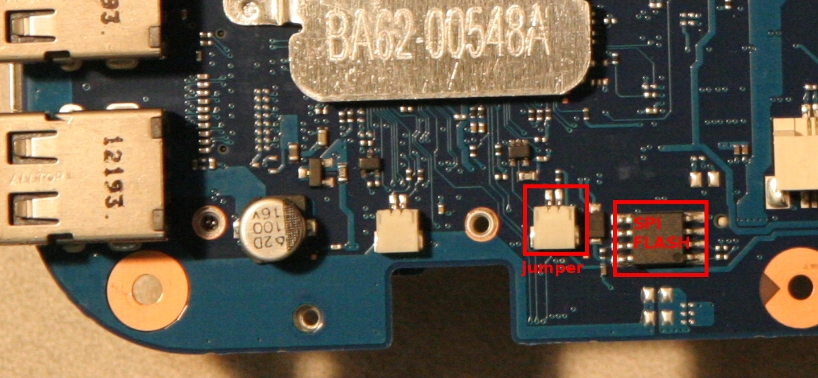
A bit of folded tin-foil made for a quick jumper.
John Lewis is maintaining a marvelous script that auto-detects and flashes an updated SeaBIOS for most ChromeBook/ChromeBox hardware:
wget https://johnlewis.ie/getnflash_johnlewis_rom.sh
chmod u+x getnflash_johnlewis_rom.sh
./getnflash_johnlewis_rom.sh
The script makes you type “If this bricks my Chromebook/box, on my head be it!” to make sure you understand that you are most likely going to brick your chromebox/chromebook by proceeding. This is no joke.
Being ok with potentially bricking my ChromeBox, I went ahead.
The script ran to completion without errors, and was thoroughly successful.
After rebooting, I now get a SeaBIOS splash identification (rather than the eventual sick computer).
The downside to doing this is that I now must boot off of an external USB device, as the SeaBIOS doesn’t seem to support booting from the built-in MMC SSD anymore.
Step 5: Install your Linux distribution
I went ahead and pulled an Ubuntu Trust 14.04 ISO and DD’ed it to a USB stick on my Mac.
wget -c http://releases.ubuntu.com/14.04/ubuntu-14.04-desktop-amd64.iso
diskutil list
hdiutil unmount /Volumes/USBSTICK
sudo dd if=ubuntu-14.04-desktop-amd64.iso of=/dev/disk5 bs=1m
After it finished flashing, I removed the USB stick from my Mac and plugged it into the front of the ChromeBox.
The USB installation media for Ubuntu was detected by SeaBIOS as the second bootable USB device.
I also attached 2 external 1TB USB disks to the back as the media that will be installed to. These appeared as the third and fourth bootable devices to SeaBIOS.
With my new SeaBIOS bootstrap, I now must hit “Esc” and “2” to boot off of the first USB stick for the Ubuntu installation.
This presented me with the Ubunu boot menu.
Beyond this point, I installed Ubuntu to the two external 1TB USB disks, with a primary boot partition (type “83”) on each for /boot as normal linux ext4, and a primary RAID partition (type “fd”) on each for the RAID1 mirror upon which I layered LVM with a volume group named “vg” and a “rootfs” and a “swapfs” logical volume. At the end, I installed the grub boot sector to /dev/sdb and /dev/sdc (the two external 1TB USB drives).
After removing the USB stick for the Ubuntu installation media, the SeaBIOS entries shifted by 1.
With my new SeaBIOS bootstrap, I now must hit “Esc” and “2” to boot off of the first USB 1TB drive, or “3” for the second USB 1TB drive.
When I figure out how to get around the SeaBIOS hang on boot if I don’t do this, I will update this blog post.
Step 4: Devstack installation of OpenStack
From this point forward, I followed the DevStack All-in-one single-machine install guide.
My local.conf for the all-in-one install is a collection of bits and pieces collected while digging around:
[[local|localrc]]

SERVICE_TOKEN=a682f596-76f3-11e3-b3b2-e716f9080d50
ADMIN_PASSWORD=nomoresecrets
MYSQL_PASSWORD=iheartdatabases
RABBIT_PASSWORD=flopsymopsy
SERVICE_PASSWORD=$ADMIN_PASSWORD
#HOST_IP=10.0.0.106
DEST=/opt/stack
LOGFILE=$DEST/logs/stack.sh.log
LOGDAYS=7
#LOG_COLOR=False
# Uncomment these to grab the milestone-proposed branches from the repos:
#CINDER_BRANCH=milestone-proposed
#GLANCE_BRANCH=milestone-proposed
#HORIZON_BRANCH=milestone-proposed
#KEYSTONE_BRANCH=milestone-proposed
#KEYSTONECLIENT_BRANCH=milestone-proposed
#NOVA_BRANCH=milestone-proposed
#NOVACLIENT_BRANCH=milestone-proposed
#NEUTRON_BRANCH=milestone-proposed
#SWIFT_BRANCH=milestone-proposed
SWIFT_HASH=66a3d6b56c1f479c8b4e70ab5c2000f5
SWIFT_REPLICAS=1
SWIFT_DATA_DIR=$DEST/data/swift
FIXED_RANGE=10.1.0.0/24
FLOATING_RANGE=10.2.0.0/24
FIXED_NETWORK_SIZE=256
PUBLIC_INTERFACE=eth0
NET_MAN=FlatDHCPManager
FLAT_NETWORK_BRIDGE=br100
SCREEN_LOGDIR=$DEST/logs/screen
VOLUME_GROUP="vg"
VOLUME_NAME_PREFIX="cinder-"
VOLUME_BACKING_FILE_SIZE=10250M
API_RATE_LIMIT=False
VIRT_DRIVER=libvirt
LIBVIRT_TYPE=kvm
#SCHEDULER=nova.scheduler.filter_scheduler.FilterScheduler
As the stack user, running ./stack.sh kicked off the install, and it completed successfully.
At the end, it tells you the URLs to use to access your new OpenStack server:
Horizon is now available at http://10.0.0.106/
Keystone is serving at http://10.0.0.106:5000/v2.0/
Examples on using novaclient command line is in exercise.sh
The default users are: admin and demo
The password: nomoresecrets
This is your host ip: 10.0.0.106
I also ended up creating this ~/.fog file locally on my Mac, based on CloudFoundry’s guide to validating your OpenStack.
:openstack:
  :openstack_auth_url:  http://10.0.0.106:5000/v2.0/tokens
  :openstack_api_key:   nomoresecrets
  :openstack_username:  admin
  :openstack_tenant:    admin
  :openstack_region:    RegionOne # Optional
With it, I can now use the fog command-line tool locally on my development Mac to manipulate the ChromeBox based OpenStack server.
Cheers!